AWS SSO and Azure SSO integration
Description
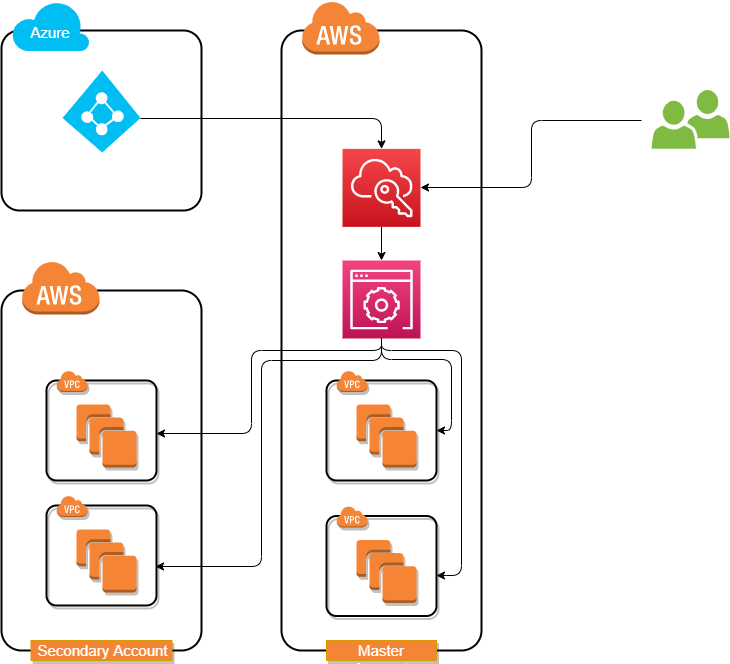
AWS Single Sign-On (SSO) allows to centrally manage access to multiple AWS accounts and business applications and provide users with single sign-on access to all their assigned accounts and applications from one place. This lab presents how to integrate AWS SSO with external Identity provider Azure SSO. It also explains how to configure automatic provisioning using SCIM.
Lab Schema
Preconfiguration
2. Create User
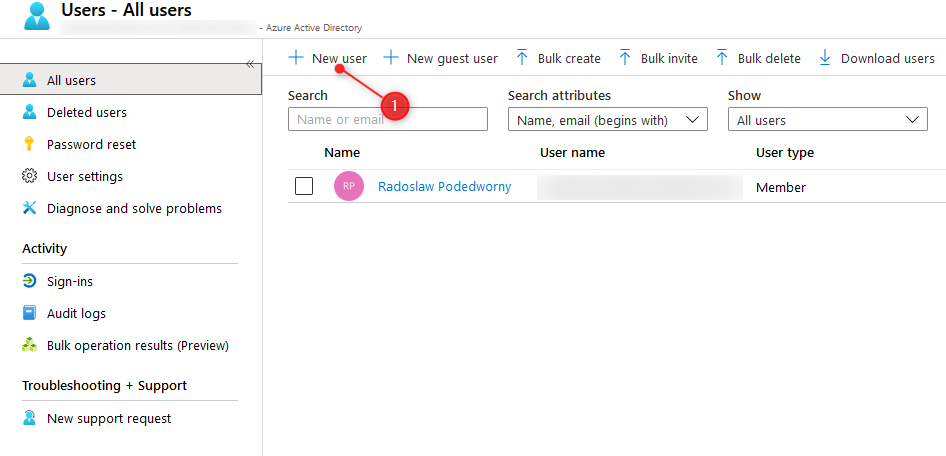
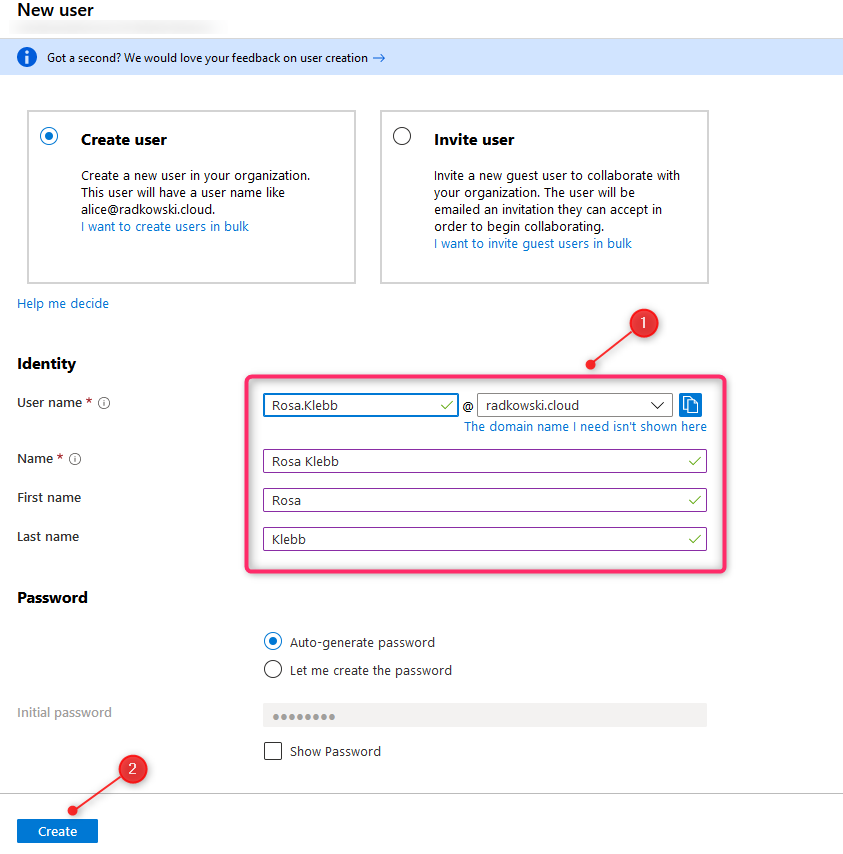
Using Azure Portal, select Create User and fill all information. It's important to populate First name and Last name (even if it's not obligatory field) as without this information, user data will not be able to transfer to AWS.
3. Create User (2)
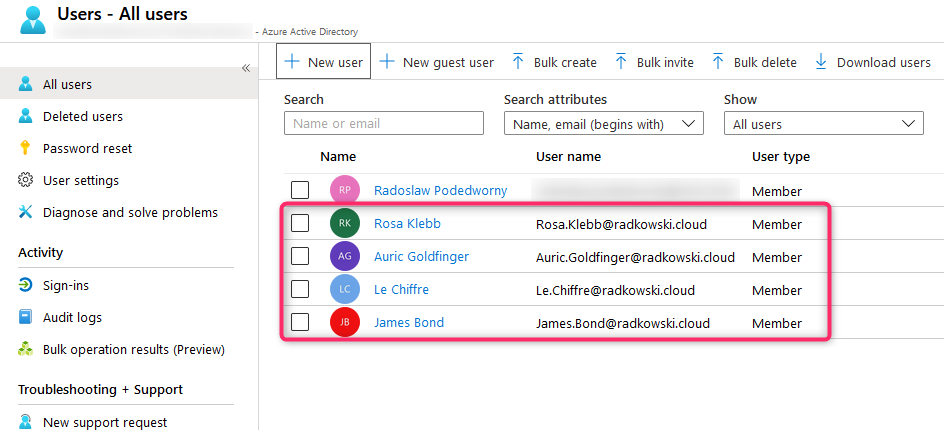
Repeat steps #1 and #2 to create all users.
4. Create group
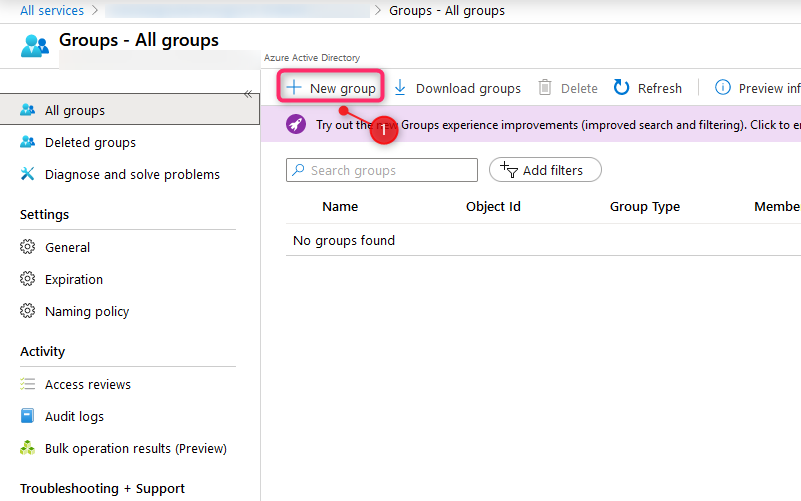
To create new group, use Azure Portal and select New Group.
5. Assign group members
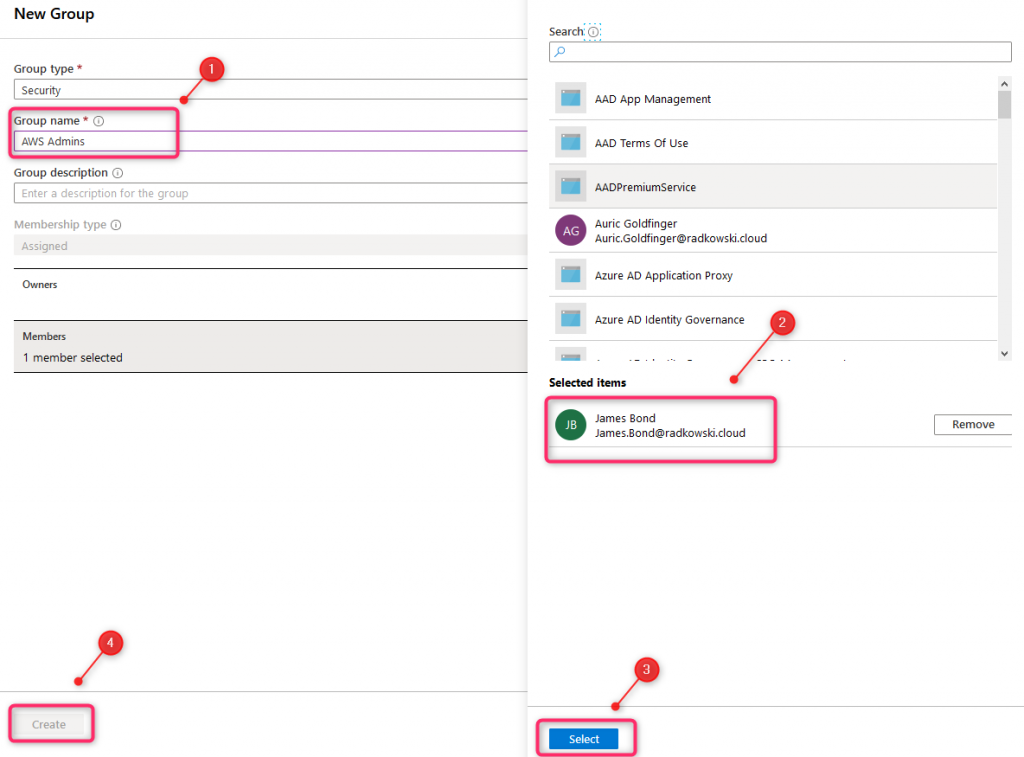
Using Azure Portal, assign users to group based on step #1
6. Create Group (2)
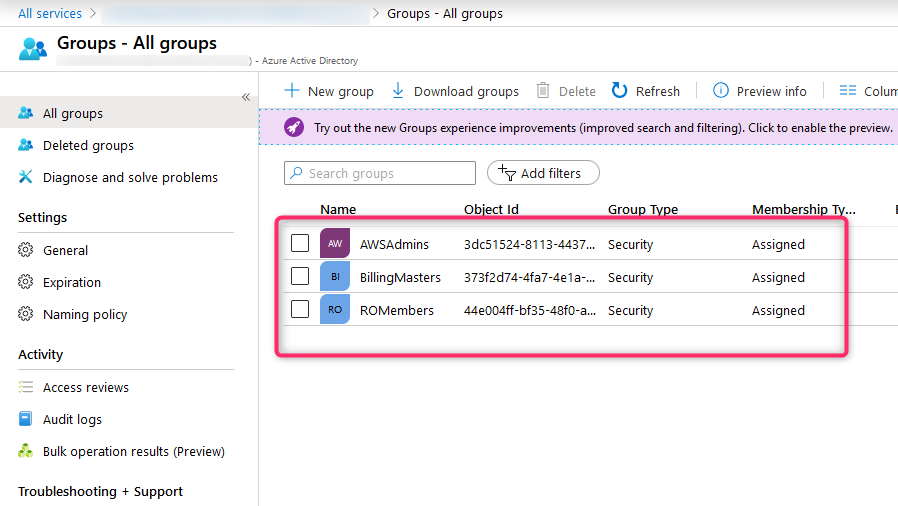
Repeat steps #4 and #5 to create all groups and assign members.
Configs (Azure part #1)
7. Create enterprise application (1)
Using Azure Portal, select Azure Active Directory, then click Enterprise Applications

8. Create Enterprise application (2)
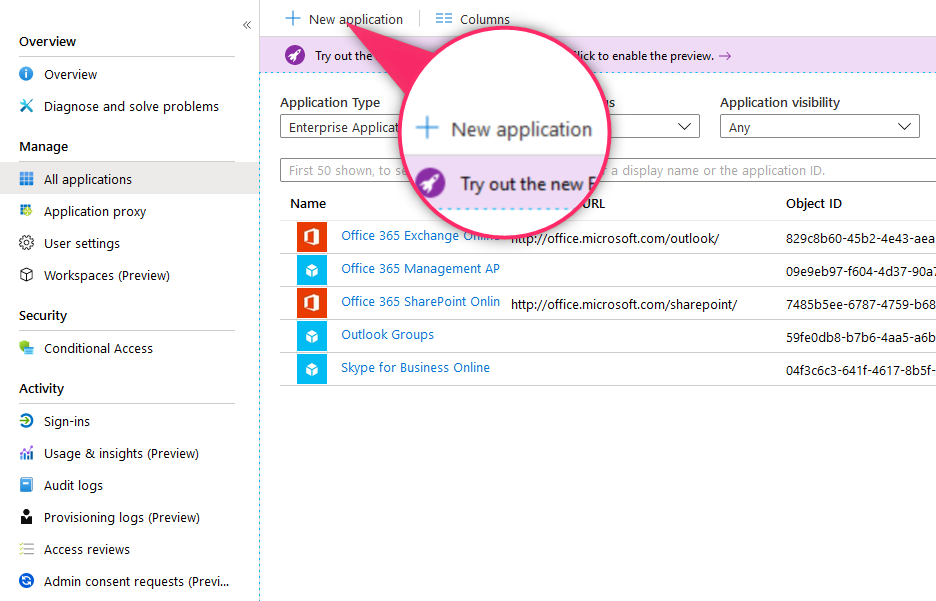
Select New application
9. Create Enterprise application (3)
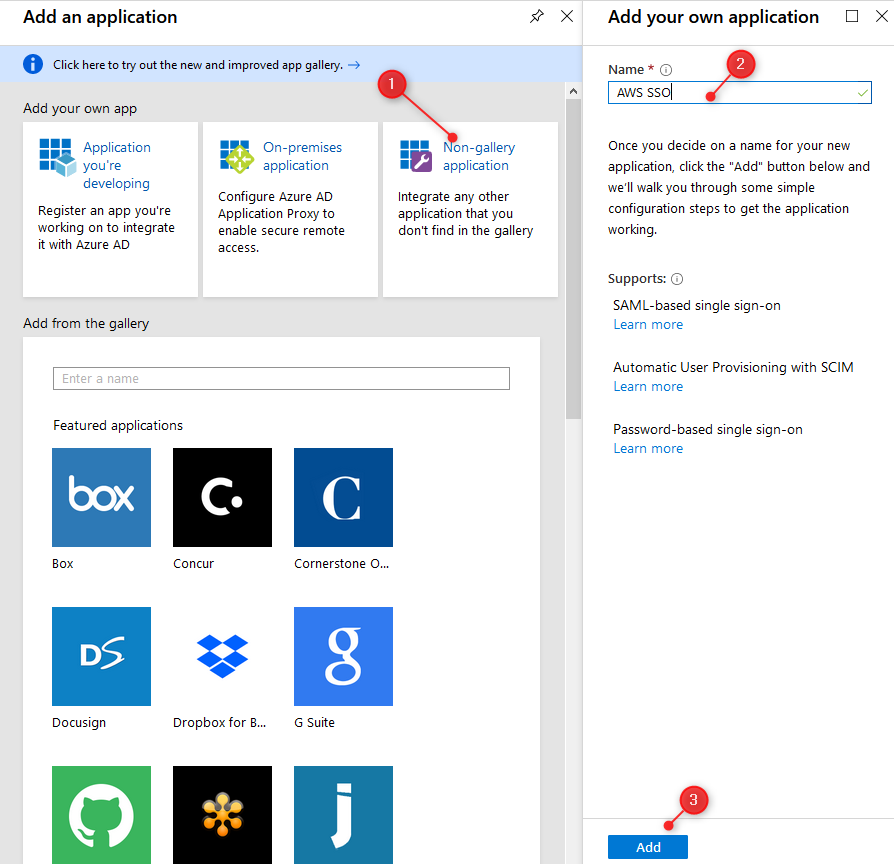
Do not select application from the gallery, press Non-gallery application, enter application name (in this lab AWS SSO wil be used but feel free to enter different name), then click Add.
Application should be ready in 10-20 seconds.
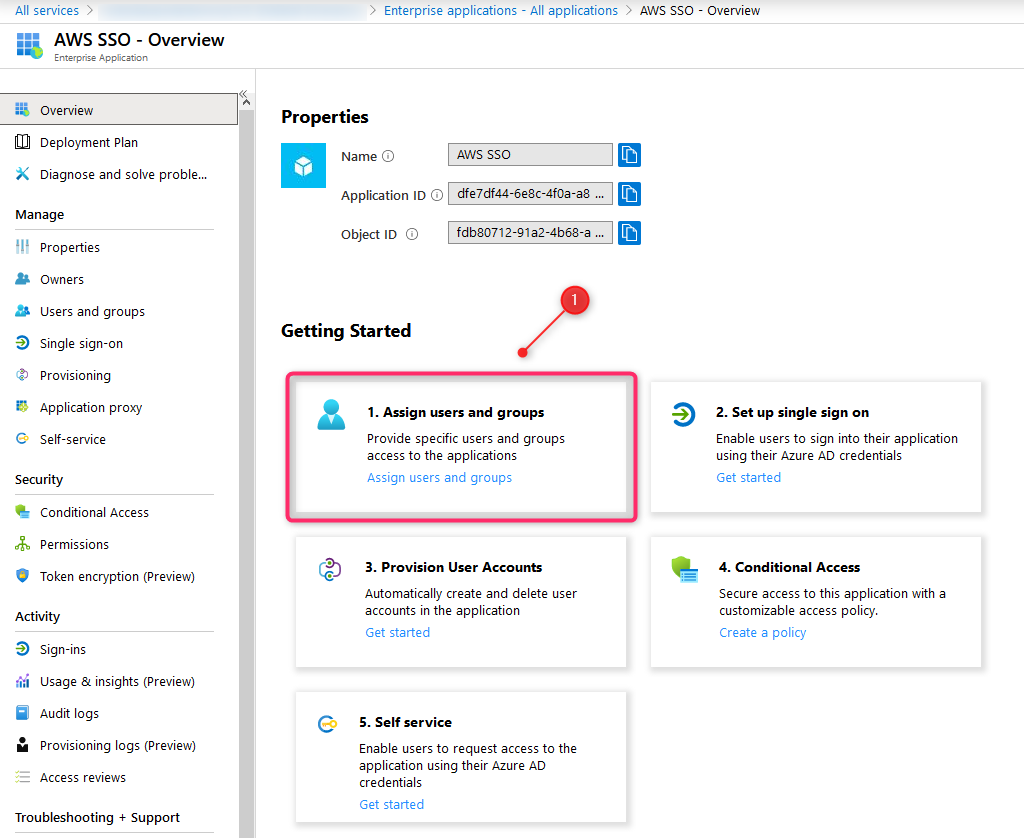
10. Enterprise application users and groups
Using Application Overview Panel, select Assign users and groups
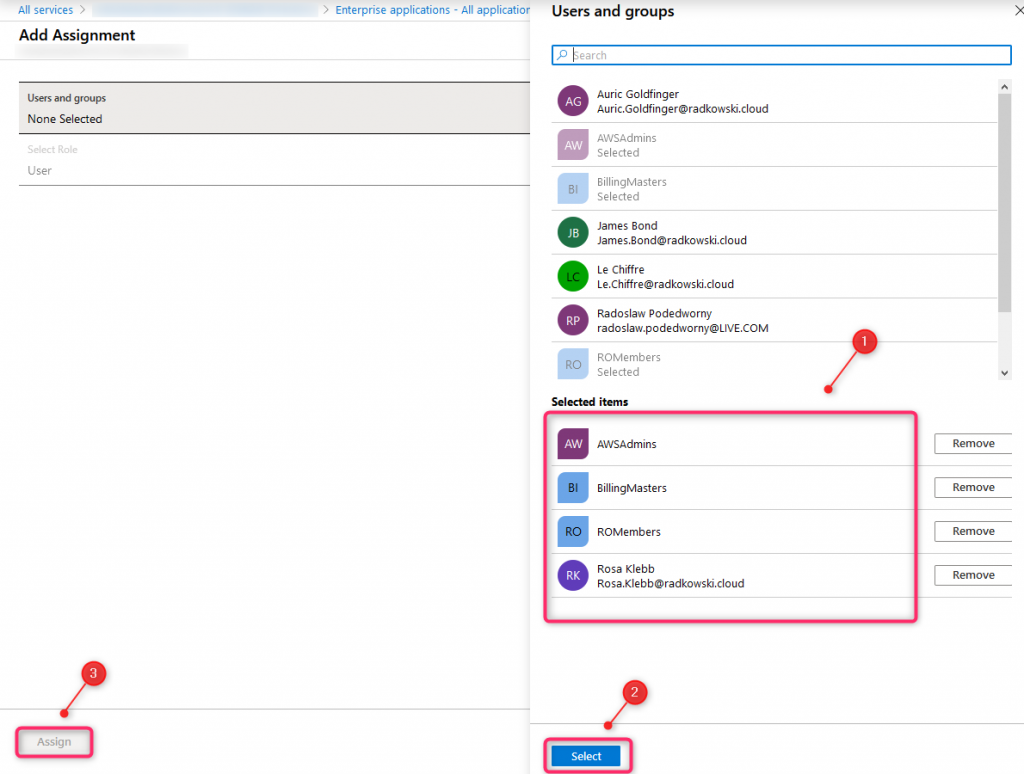
11. Enterprise application users and groups (2)
Using Add Assigment tab, select three previoulsy created groups and Rosa Kleeb (this user is not a member of any group)
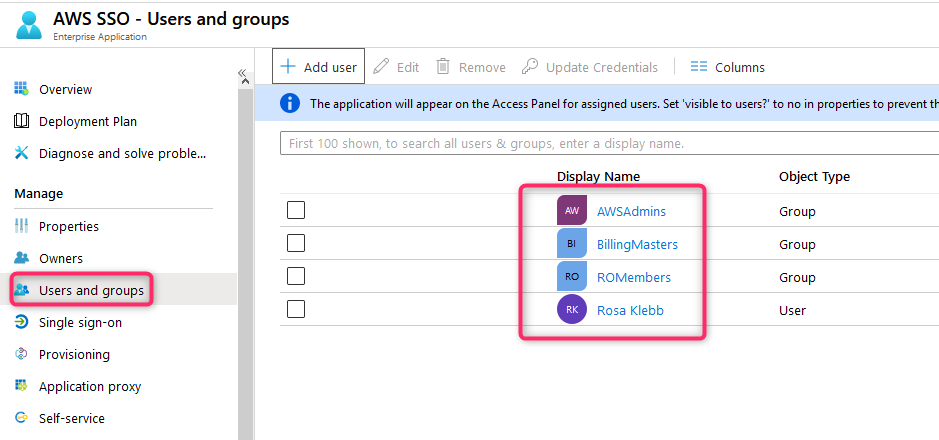
12. Enterprise application users and groups (3)
AWS SSO - Users and Groups tab should display three groups and one user
13. Azure SSO Config (1)
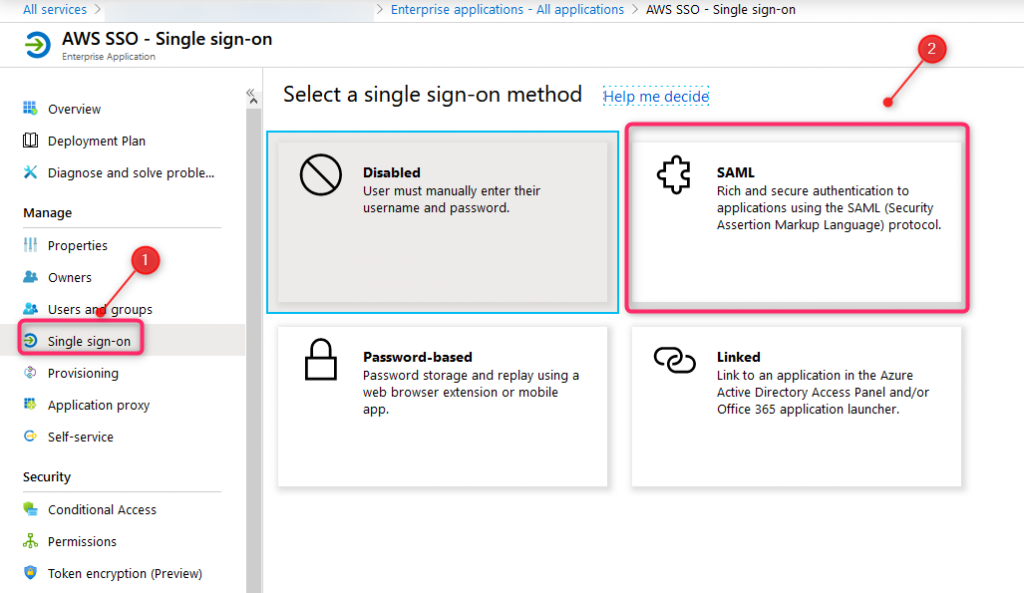
From Enterprise application tab, select Single sign-on and click SAML
14. Azure SSO Config (2)
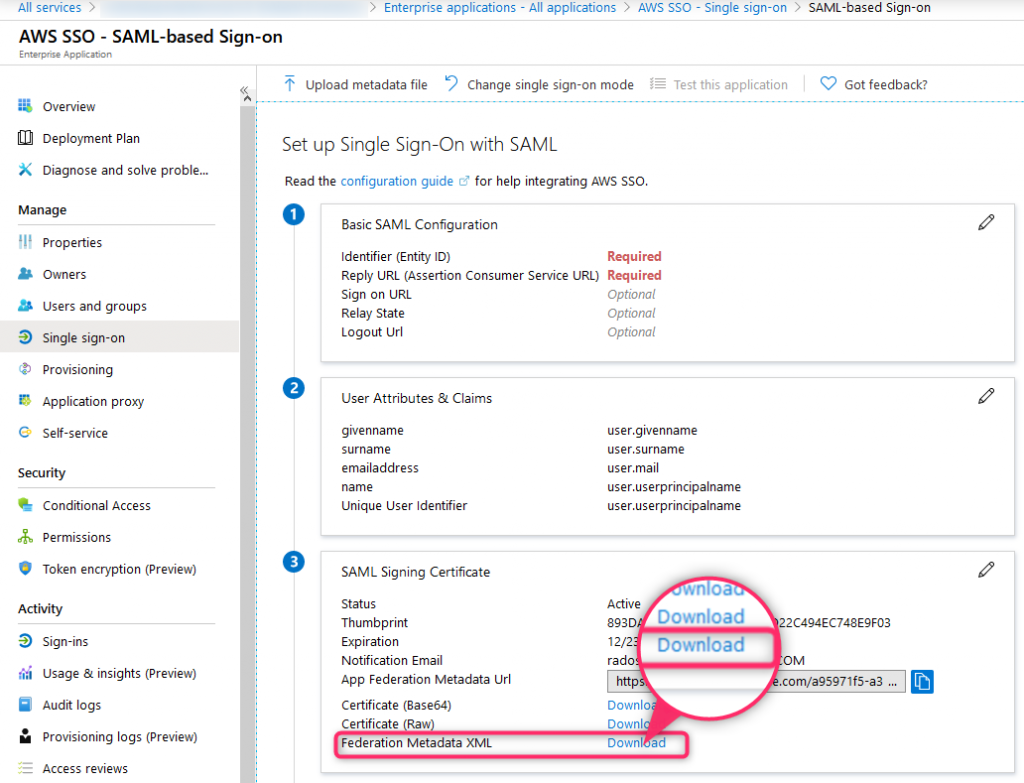
Download Federation Metadata XML (this file will be used to configure SSO on AWS side)
Configs (AWS part #1)
15. Enable AWS SSO
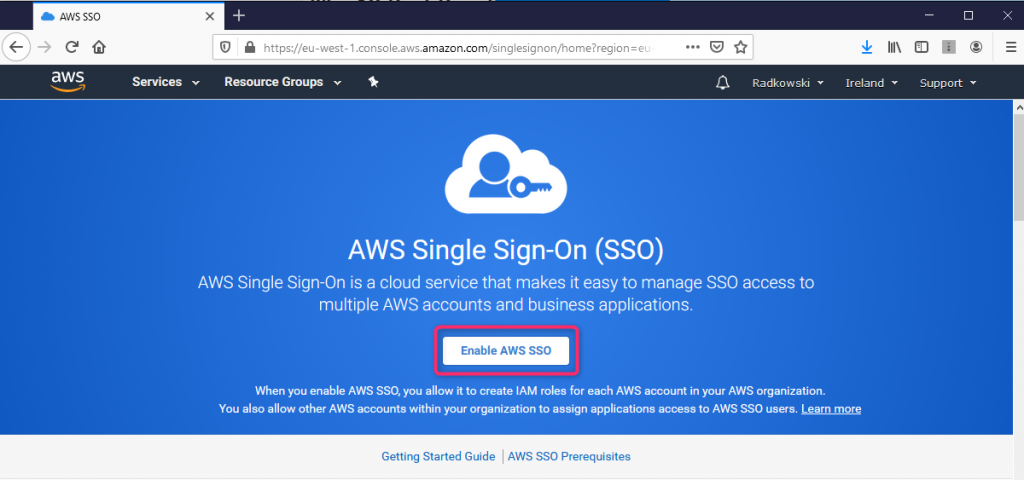
Log into AWS Console, select SSO and click Enable AWS SSO
16. AWS SSO settings (1)
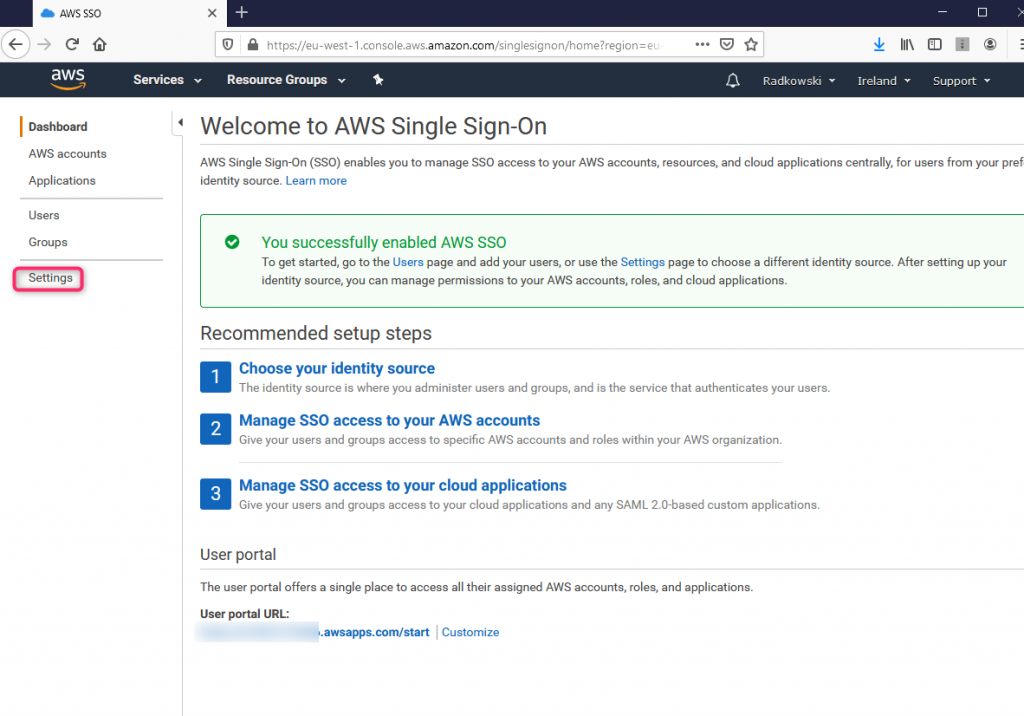
Once AWS Single Sign-On will be activated, click Settings
17. AWS SSO settings (2)
Select Change to modify Identity source

18. AWS SSO settings (3)
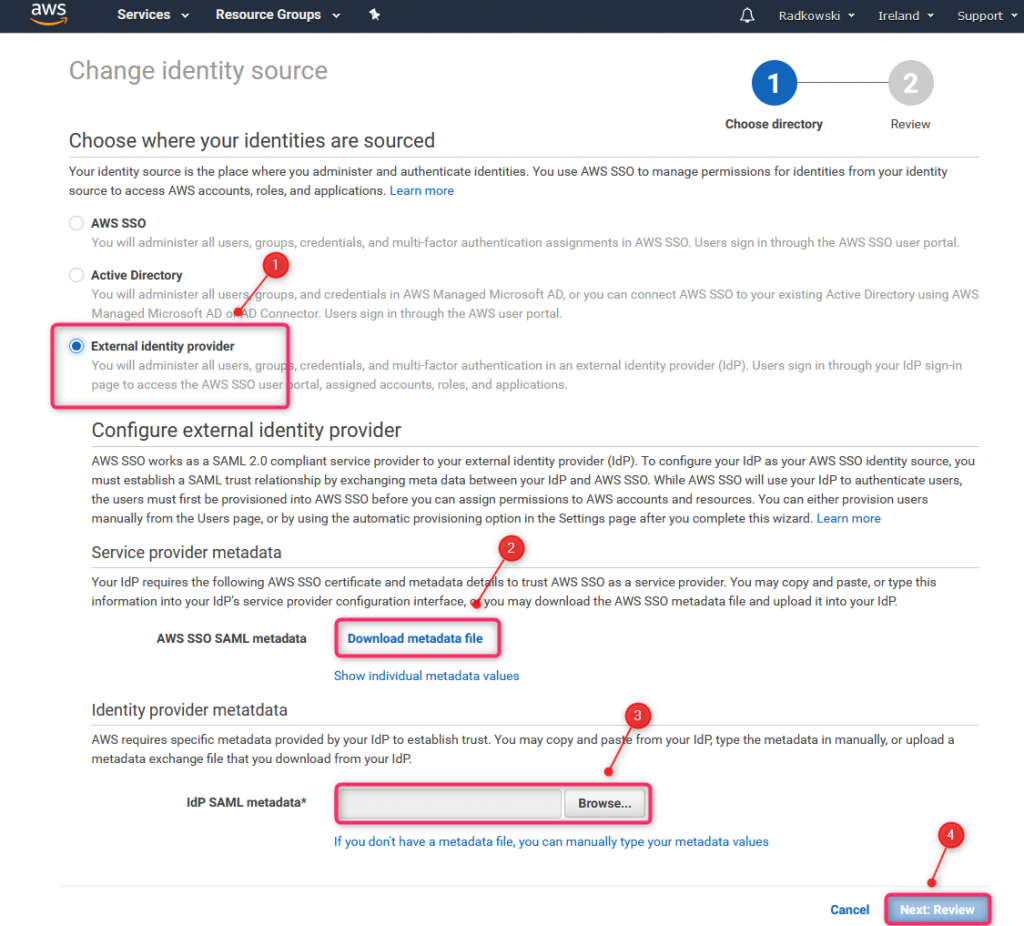
Select External Identity provider, download metadata file and upload Azure metadata (previously downloaded in step #14)
19. AWS SSO settings (4)
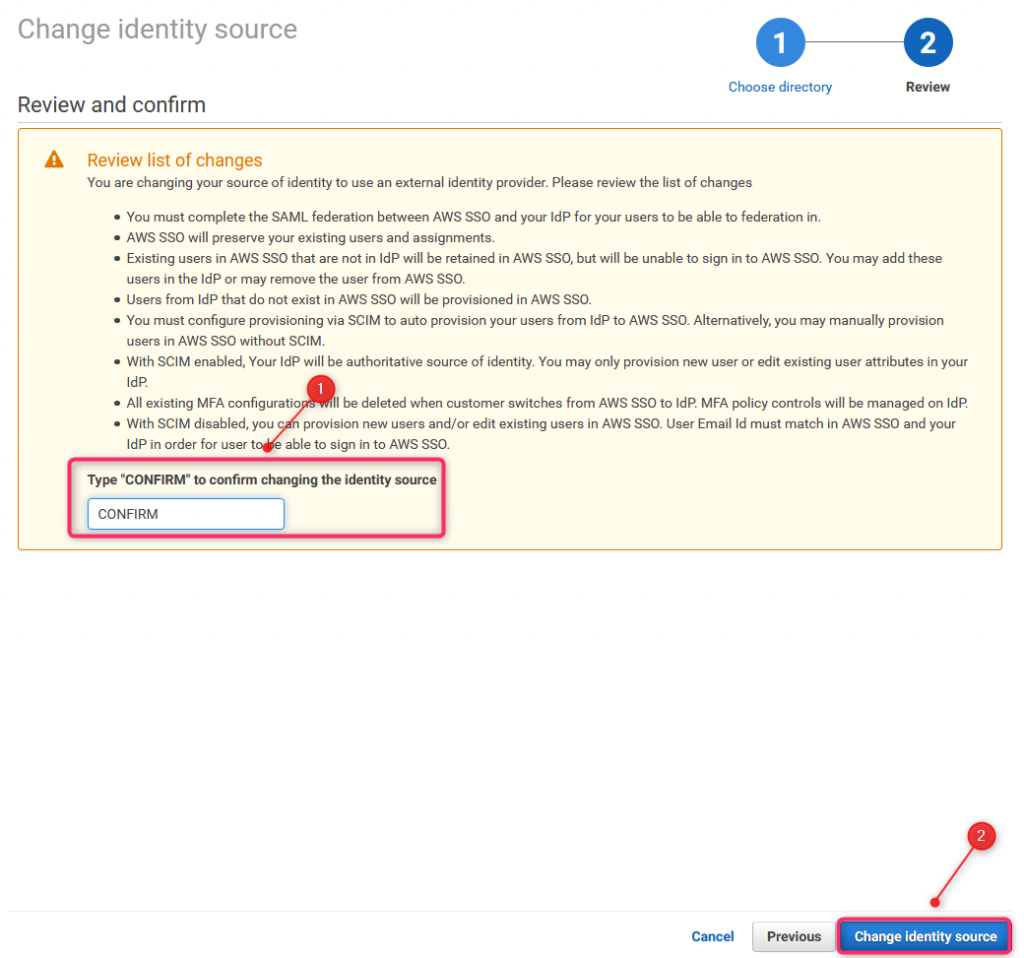
To confirm changes, type CONFIRM and click Change Identity source
20. AWS SSO provisioning settings (1)
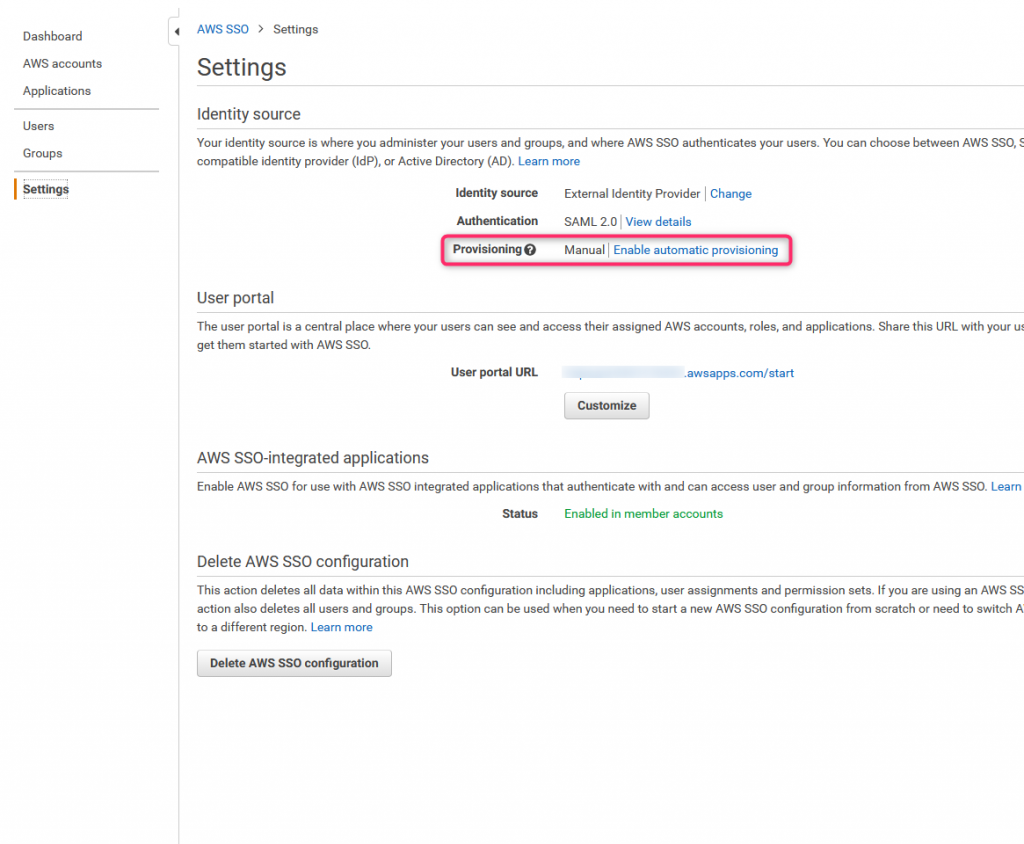
Come back to AWS SSO page, select Settings and click Enable automatic provisioning
21. AWS SSO provisioning settings (2)
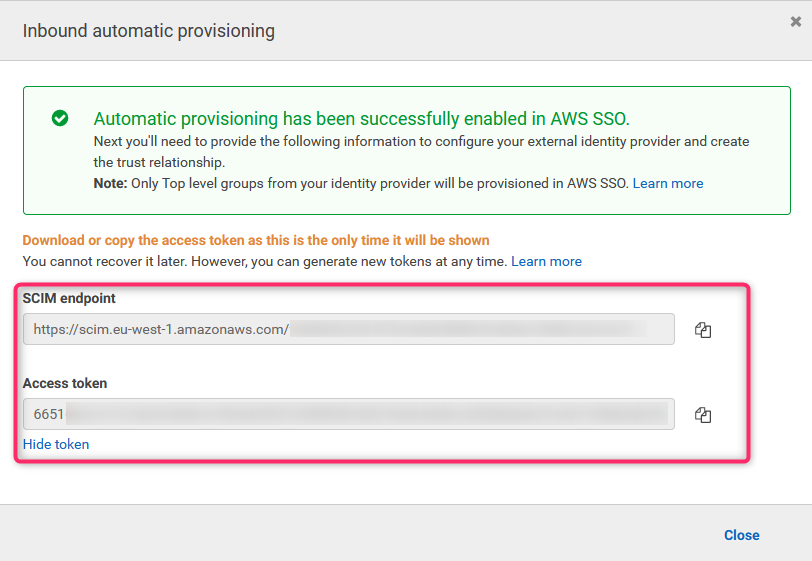
AWS will display SCIM endpoint and Access Token. Safe both in safe place.
Now you can come back to Azure Portal
Configs (Azure part #2)
22. Azure SSO Config (3)
Select Single sign-on, click Upload metadata file and upload, previously download (step #18) xml
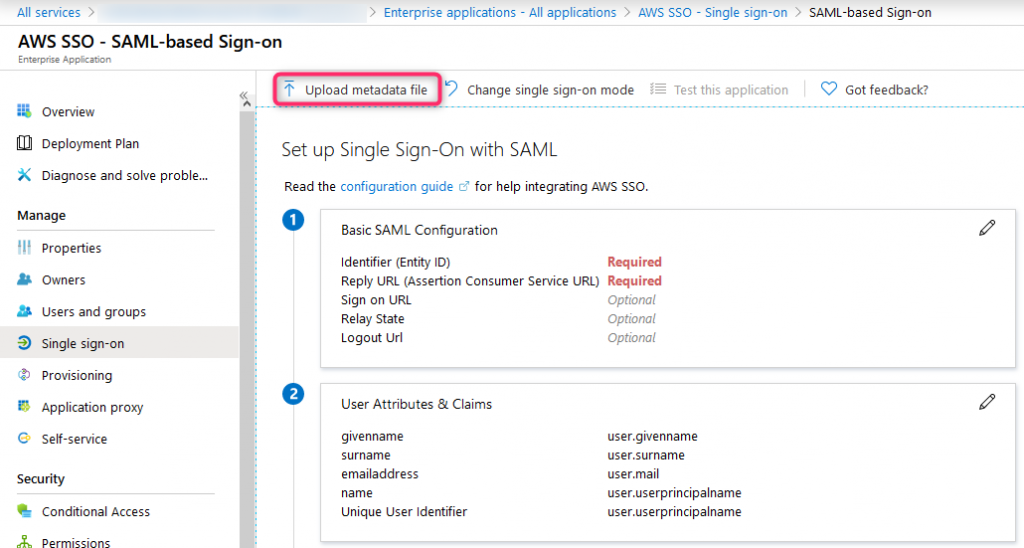
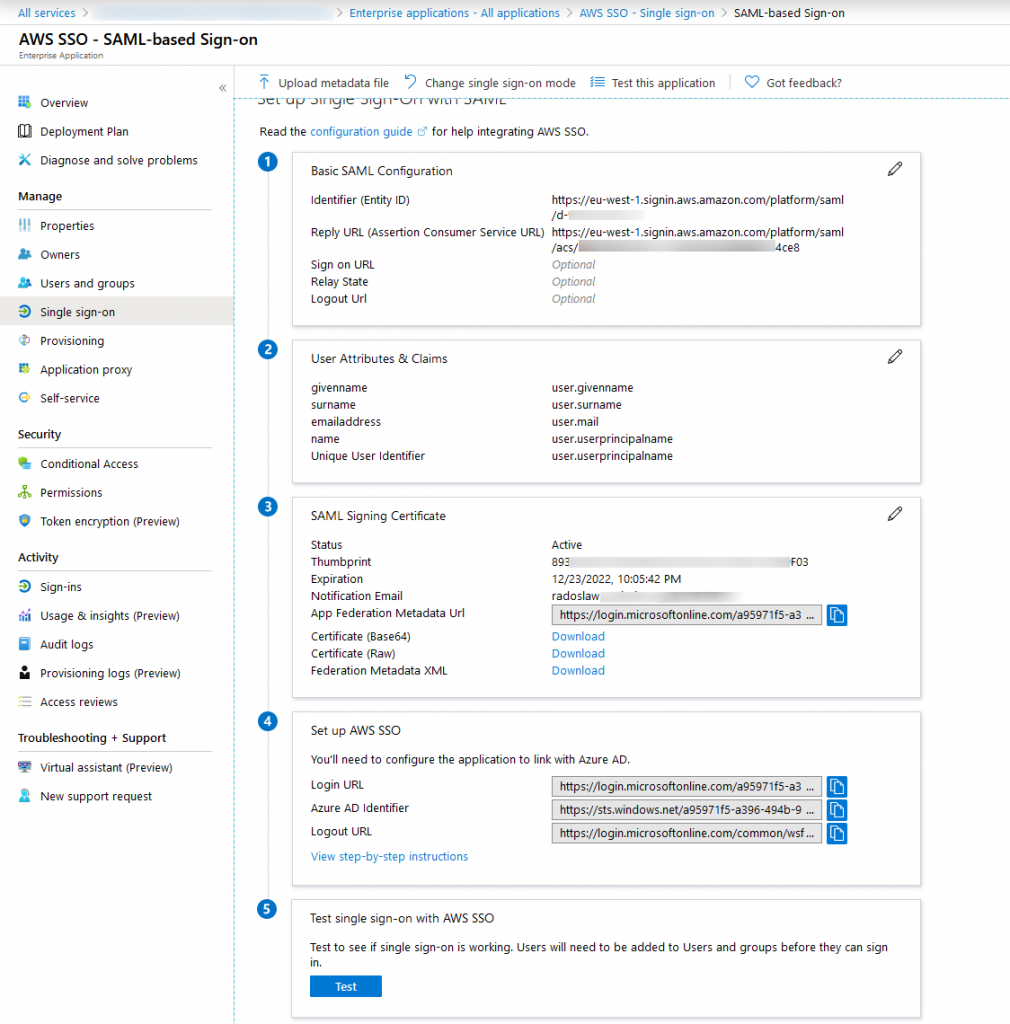
23. Azure SSO Test
Once metadata will be uploaded, comfiguration can be checked using Test button
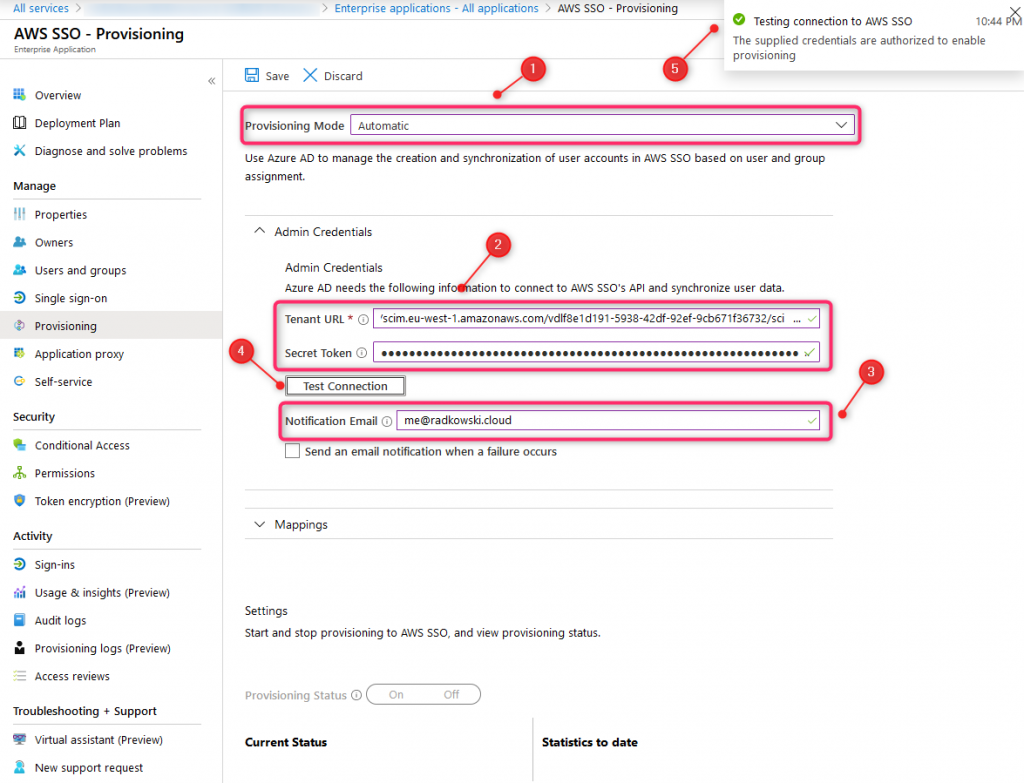
24. Automatic provisioning Config (1)
Using Enterprise Application view, click Provisioning, then change Mode to Automatic. System asks about admin credentials: use data saved in step #21. You can also enter notification email and test connection. If everything is OK, you will get information: The supplied credentials are authorized to enable provisioning.
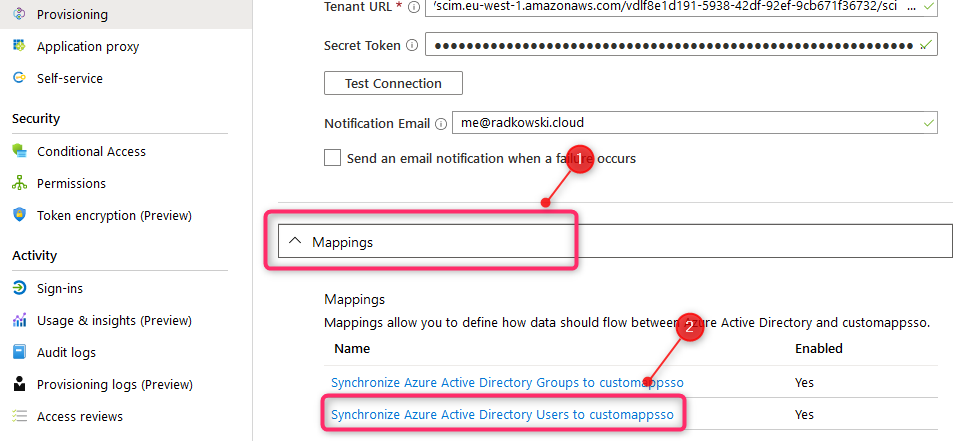
25. Automatic provisioning - mapping settings (1)
Select Mappings, then click Synchronize Azure Active Directory Users to customappsso
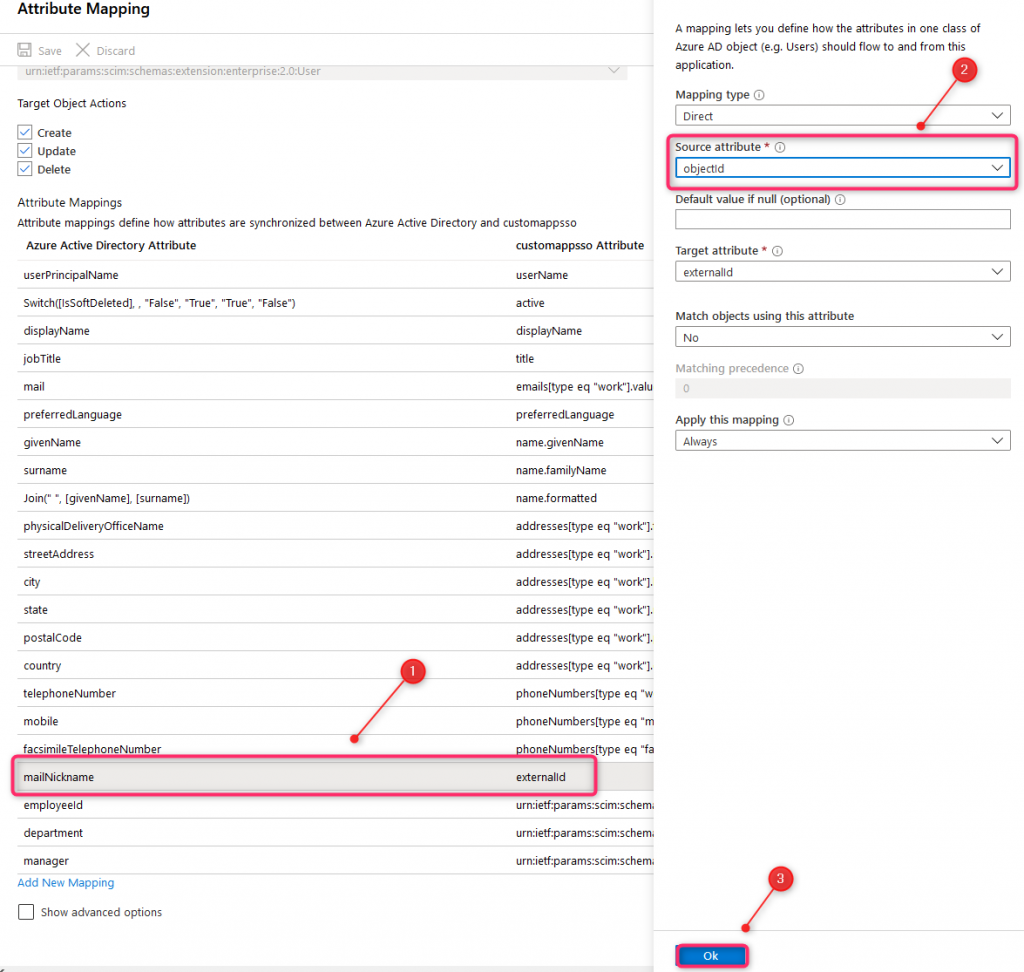
26. Automatic provisioning - mapping settings (2)
Find mailNickname and change Source attribute to objectid
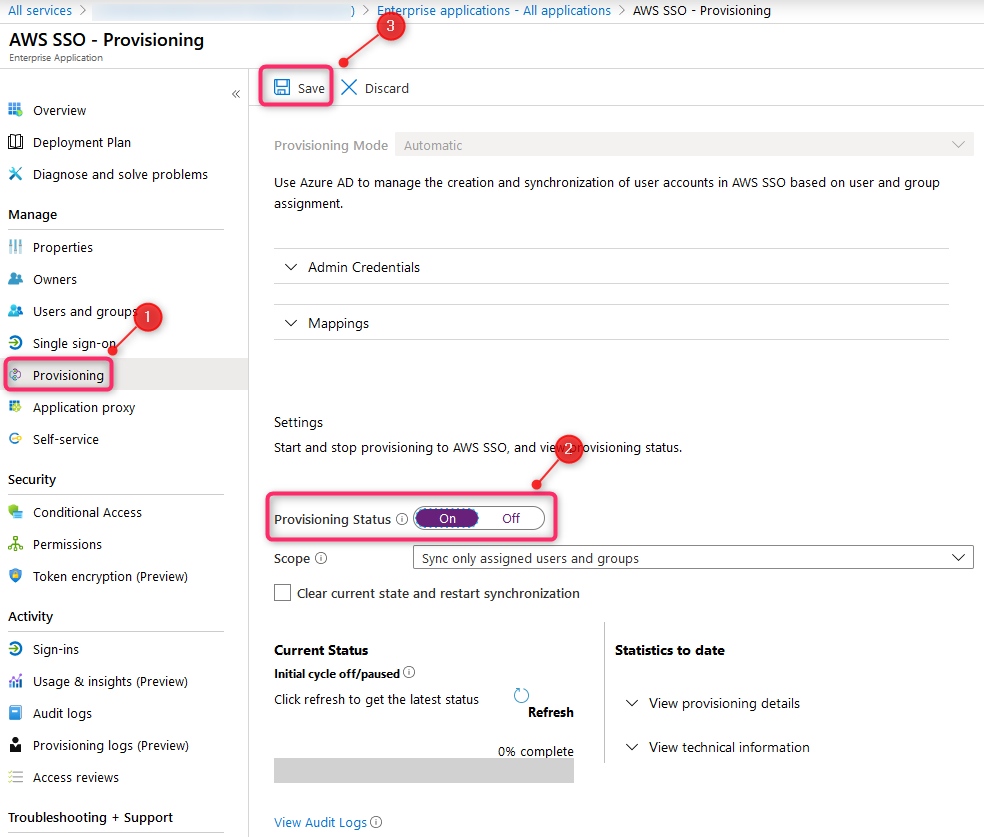
27. Automatic provisioning Config (2)
Change Provisioning Status to On and select Sync only assigned users and groups
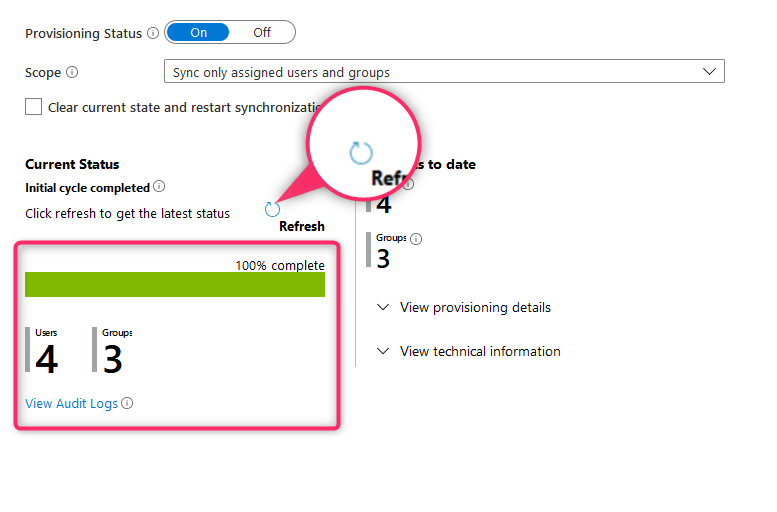
28. Automatic provisioning - status info
Click Refresh to get information about sync status. Bear in mind, initial sync will take up to one hour. Once sync will be established, all new changes will be synced every 40mins
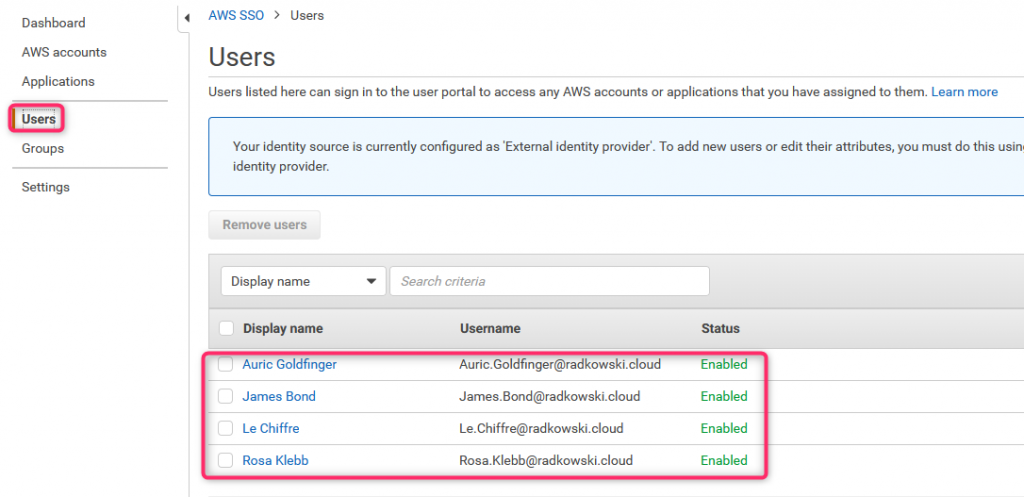
Configs (AWS part #2)
29. AWS SSO - users list
Come back to AWS Console. Once sync will be finished, all synced used will be available in tab Users ...
30. AWS SSO - groups list
... as well as synced groups
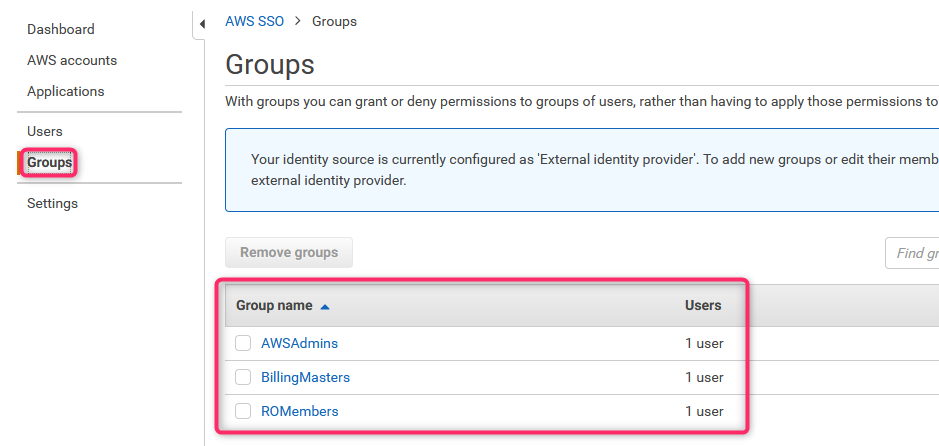
31. AWS Access scenario #1 (1)
Click AWS accounts, select which accounts you want to grant access into and click Assign users
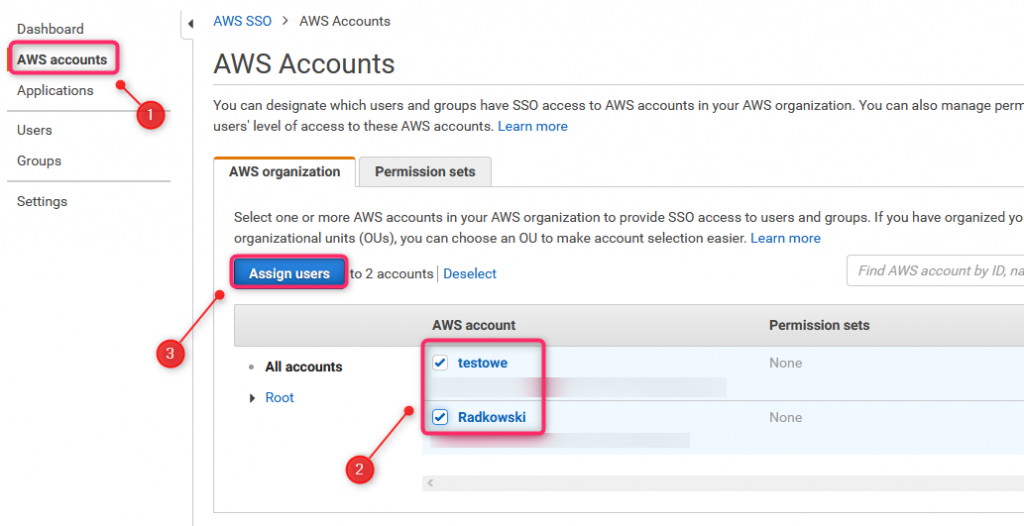
32. AWS Access scenario #1 (2)
You can assign users and/or groups independently. In current scenario no user is selected, only groups
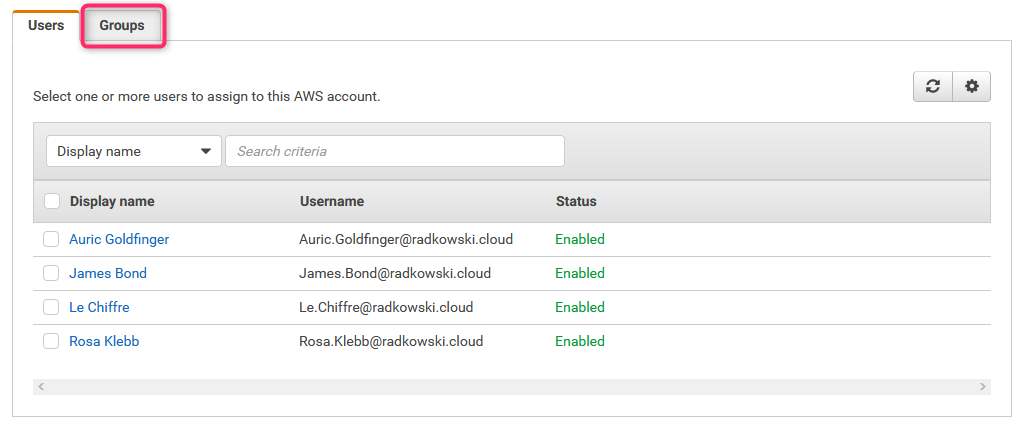
33. AWS Access scenario #1 (3)
Select group AWSAdmins (this group has only one member configured in Azure: James Bond)
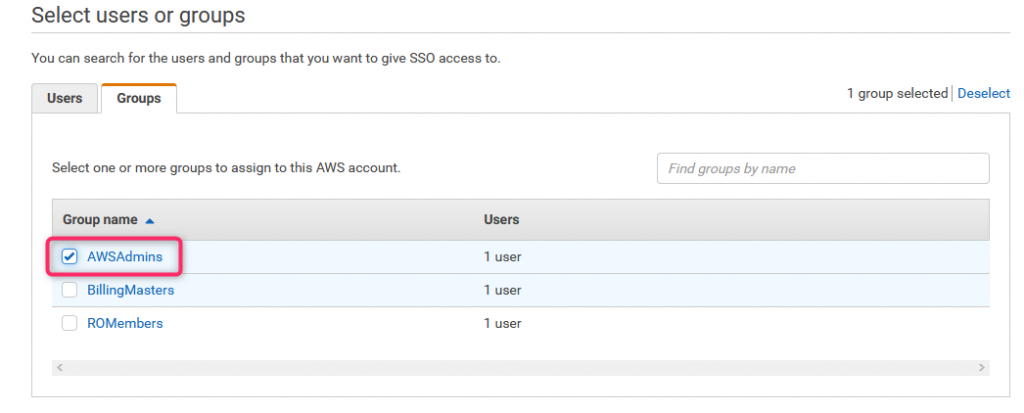
34. AWS Access scenario #1 (4)
As no permission sets has been created, select Create new permission set
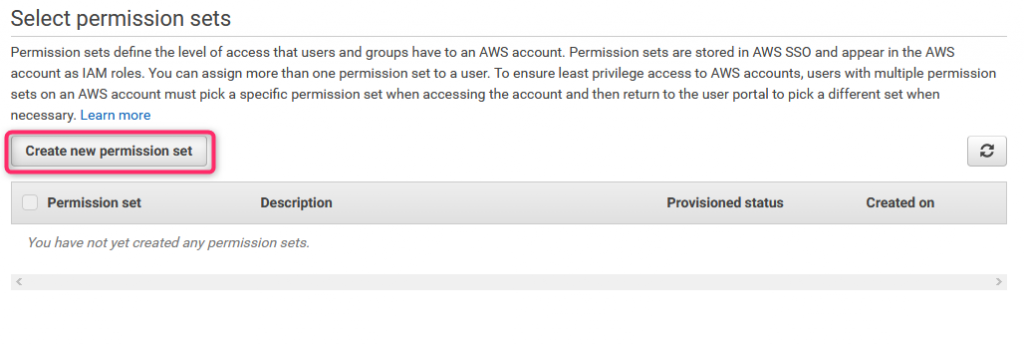
35. AWS Access scenario #1 (5)
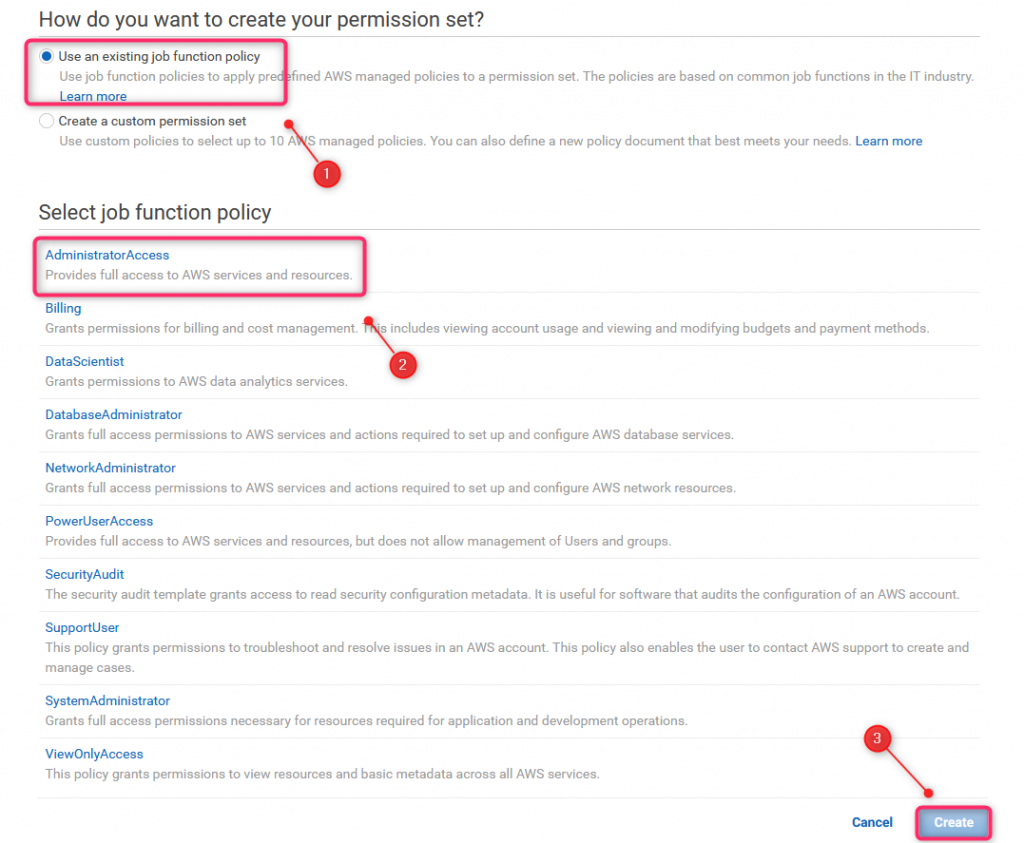
Permission sets can be created from the scratch or based on predefined template. To choose option #2, select: Use an existing job function policy, then Administrator Access (AWSAdmins group should have full access to all AWS services and resources)
36. AWS Access scenario #1 (6)
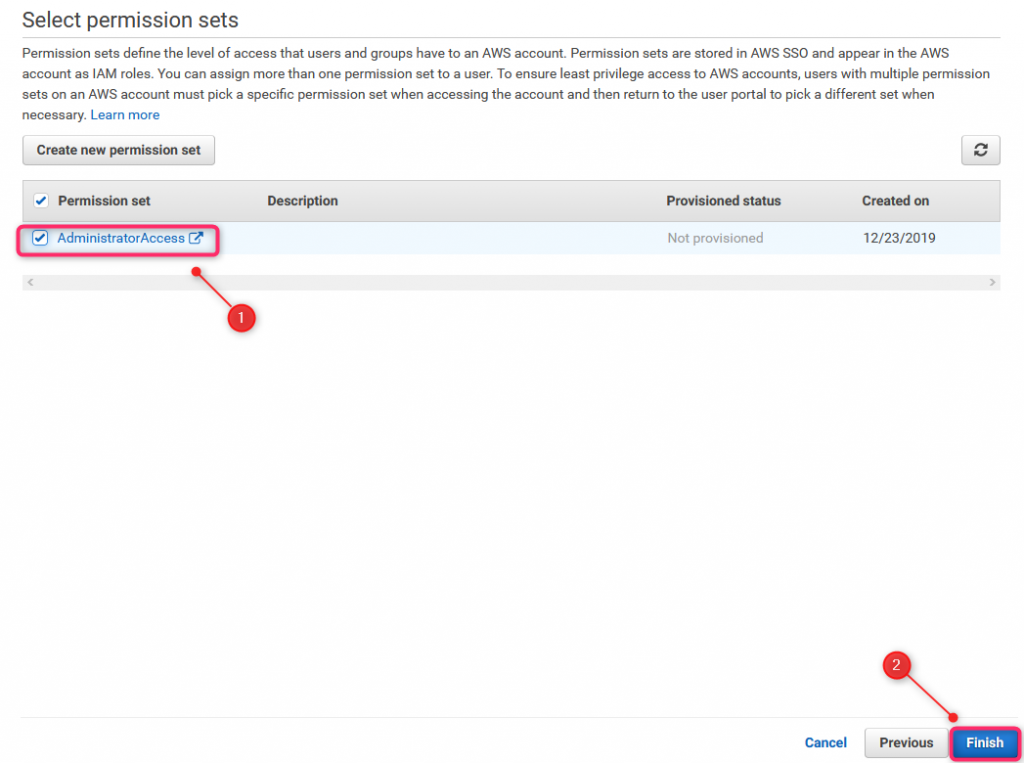
Check previously created permission set and click Finish.
Since now, all AWSAdmins group members will have full access to all AWS accounts
37. AWS Access scenario #2 (1)
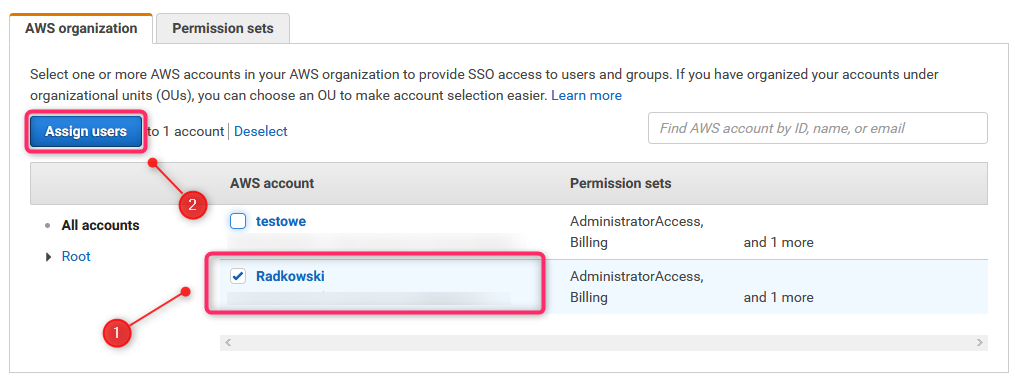
Different permissions for different accounts can be assigned to one user. Scenario 2 shows Billing role assigned to James Bond but only for one AWS account. Step one: select acount(s)
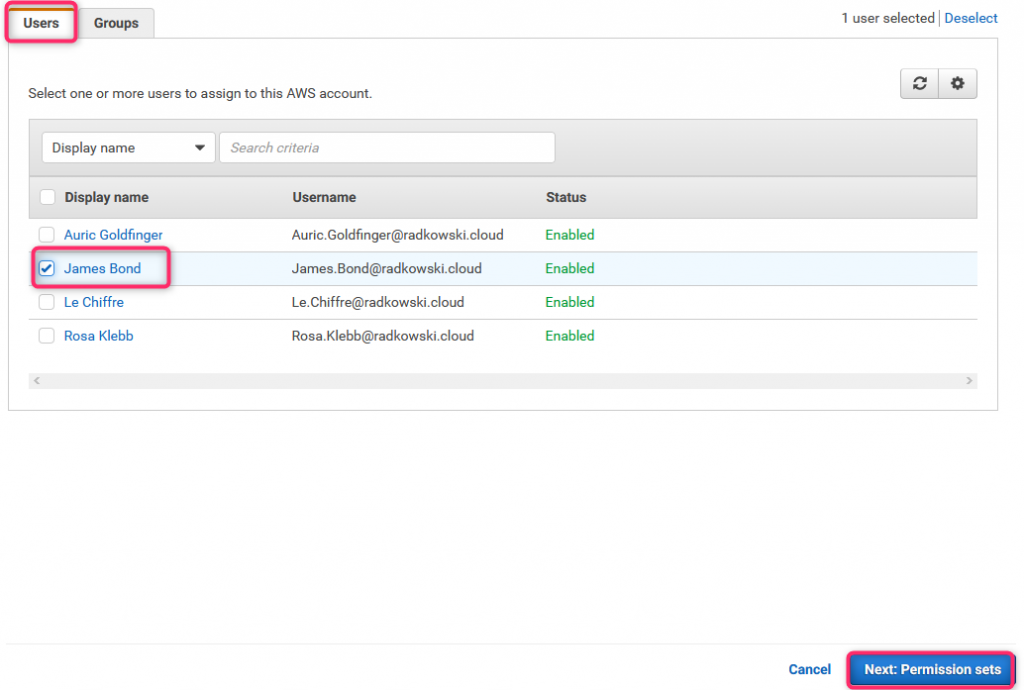
38. AWS Access scenario #2 (2)
Step 2: select user(s) and/or group(s)
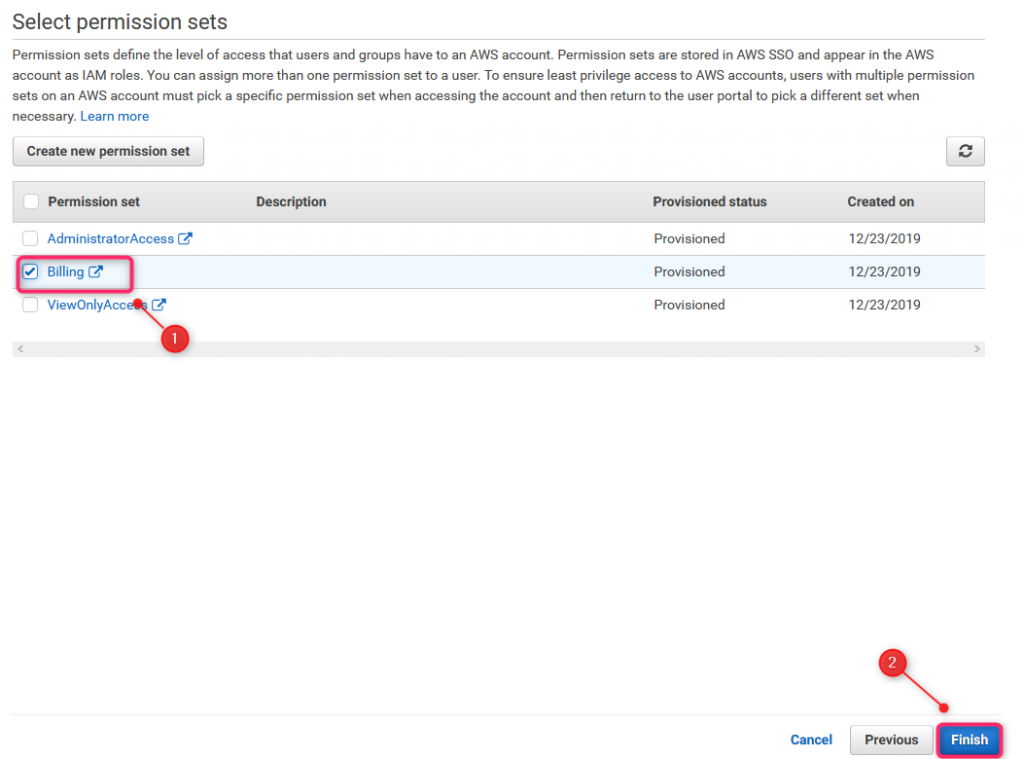
39. AWS Access scenario #2 (3)
Step 3: select permission set(s)
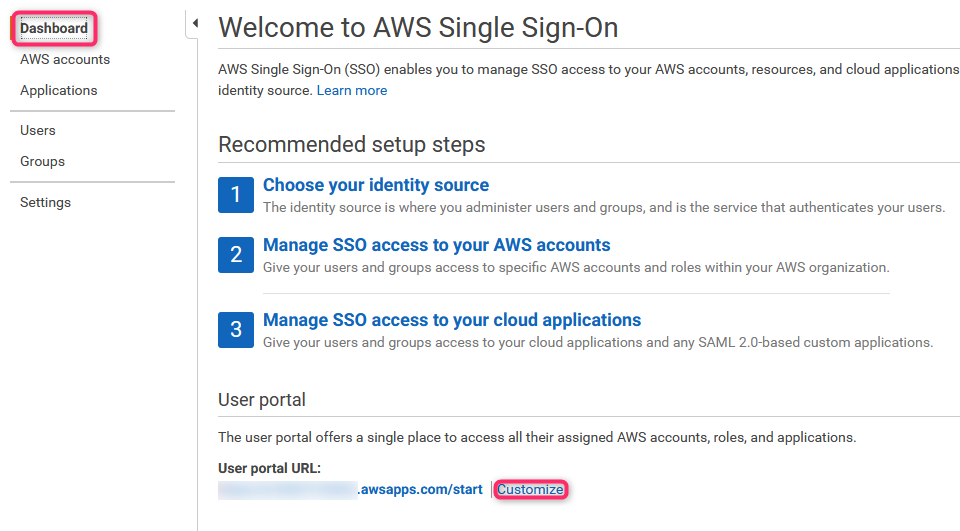
40. User Portal
User portal is an unique url, which allows users to log and use SSO. This link can be found via AWS SSO Dashboard.
Bear in mind, users will still be able to log into individual accounts using AWS Console
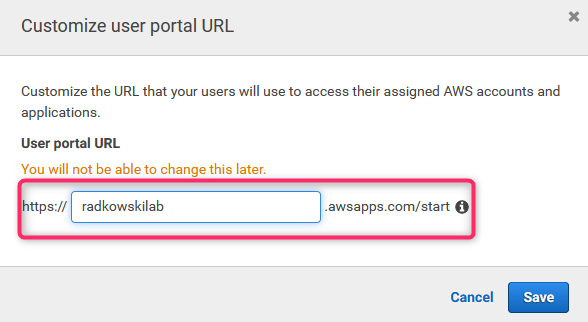
41. User Portal Customization
User portal URL prefix can be customised, hovewer it can be done only once.
Test Area
42. James Bond
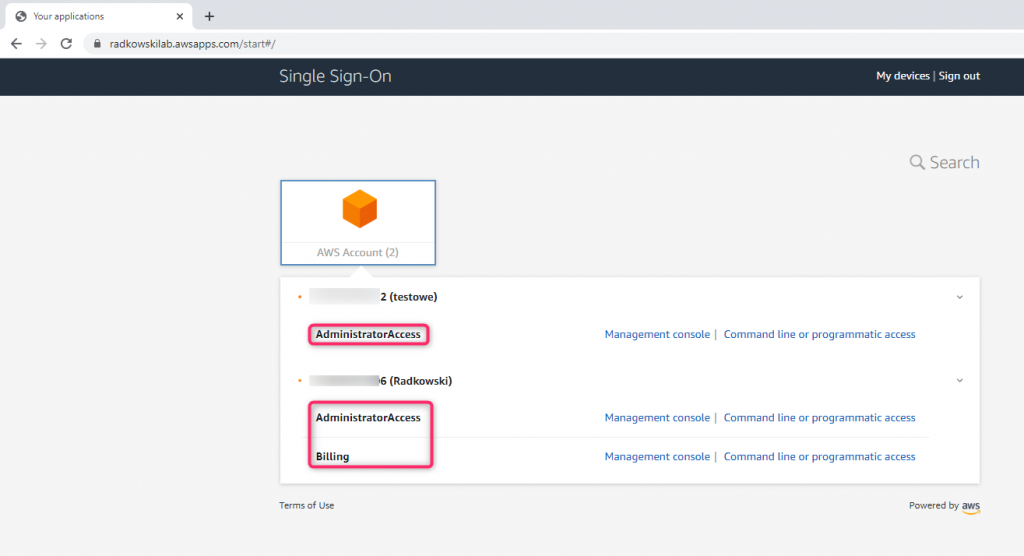
To check if all configuration has been done properly, log via Customer Portal using James Bond credentials. This user should have AdministratorAccess to both accounts (as a member of AWSAdmins group), and Billing access to one account (assigned in steps 37,38 and 39)
43. Auric Goldfinger
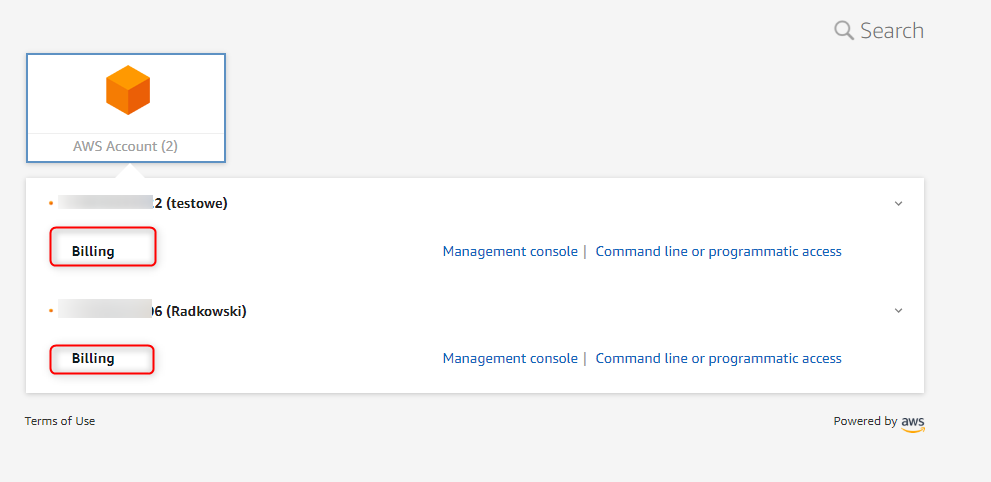
Next use Auric Goldfinger credentials. As a mamber of BillingMasters group, he will have Billing role to both accounts.
44. Le Chiffre
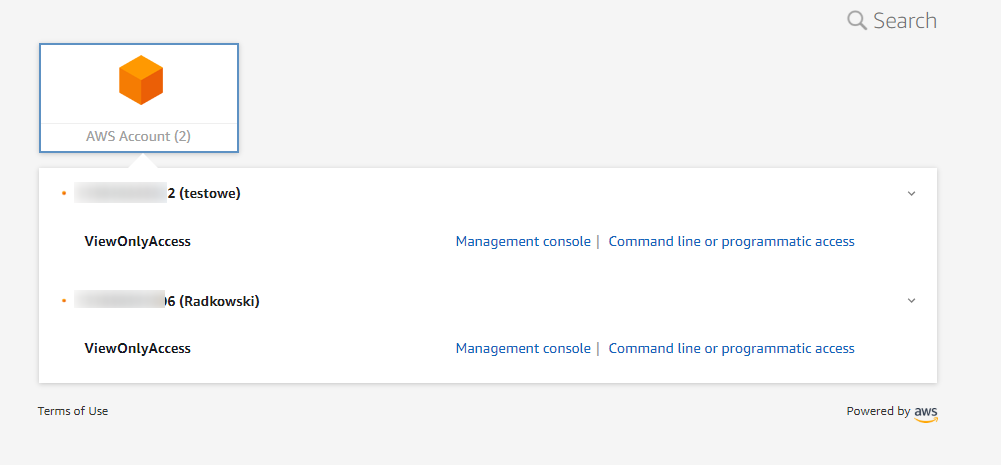
As Le Chiffre is a member of ROMembers group, he will have ReadOnly access to both accounts.
45. Rosa Klebb
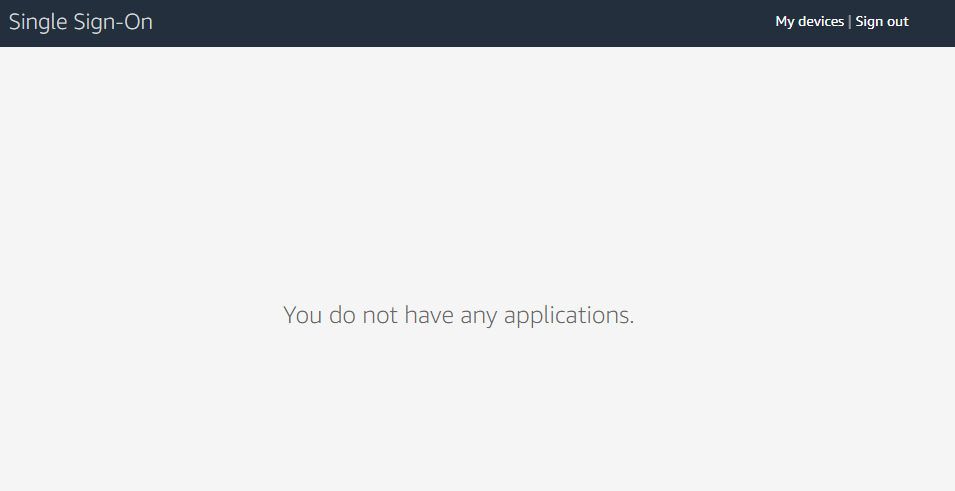
Finally Rosa Klebb. She exists as an user in SSO, but as she is not a member of any group and she was not assigned to any acccount(s) directly, her Customer Portal view will be empty.
46. Federated Login info
Every time, when you log in using AWS SSO, your username infomration will inform about it to present your Federated Login details instead of standard user name.

